Hindsight is 20-20. If you ever wished you’d planted more of something, less of something, or planted it in a different spot or at a different time, this post is for you. Today I’m going to take you through my entire garden planning process start to finish in 6 easy steps to make sure every year (including this year!) is your best harvest yet.
Make sure you stick around until the very end and I’ll go over some quick tips when you’re shopping for seed varieties.
1. Review
Ok, so first things first, go grab a warm cup of tea, a notebook or garden journal, and let’s sit down and go over the last year.
What Went Well?
The first question I like to ask myself is: “What went well?”
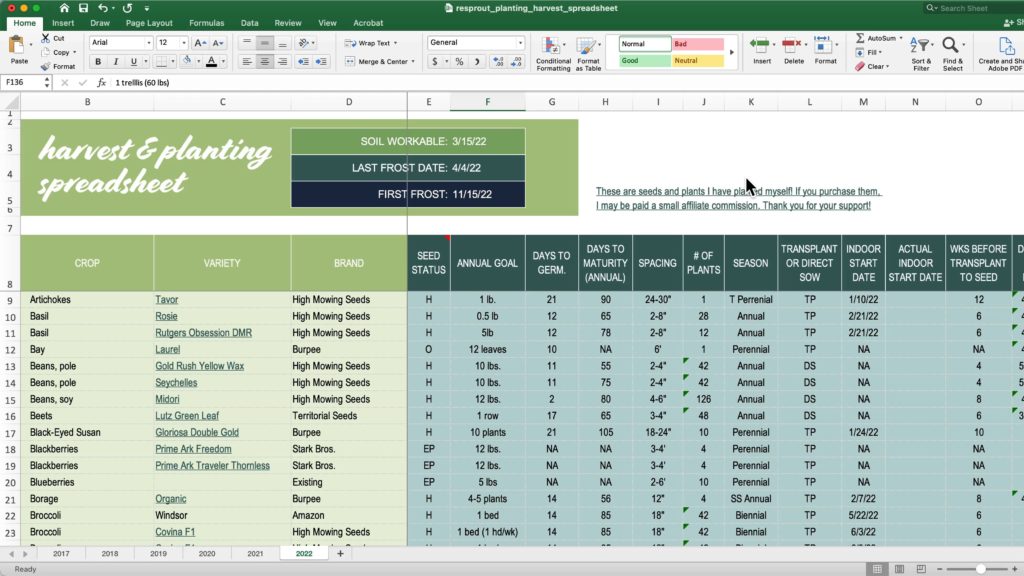
One of the things I do at this stage is finalize my planting spreadsheet, plugging in all the weights of all the crops I harvested so I can really see the results.
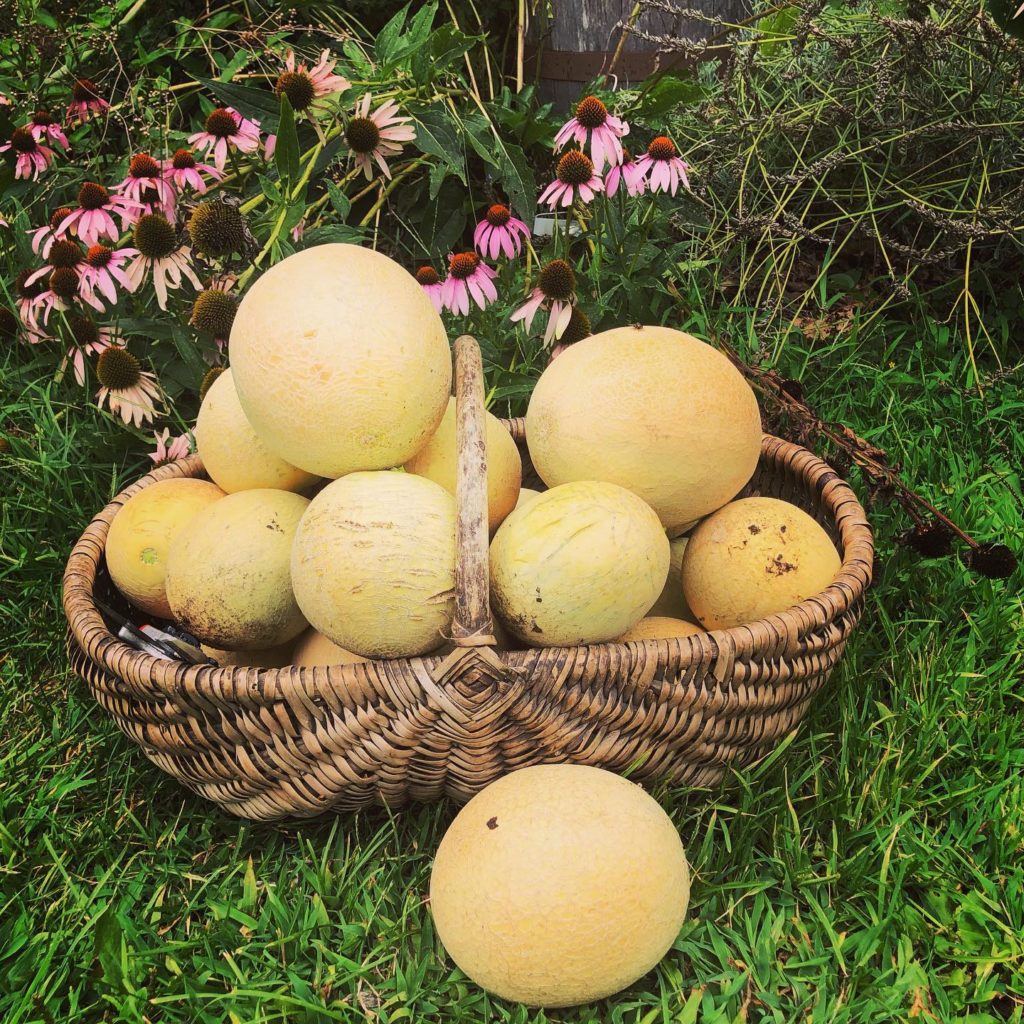
This year, I was really happy with my cantaloupe production. I switched from trellising them to putting them in raised beds and I went from 1 melon to over 20 melons. That’s over 52 pounds!
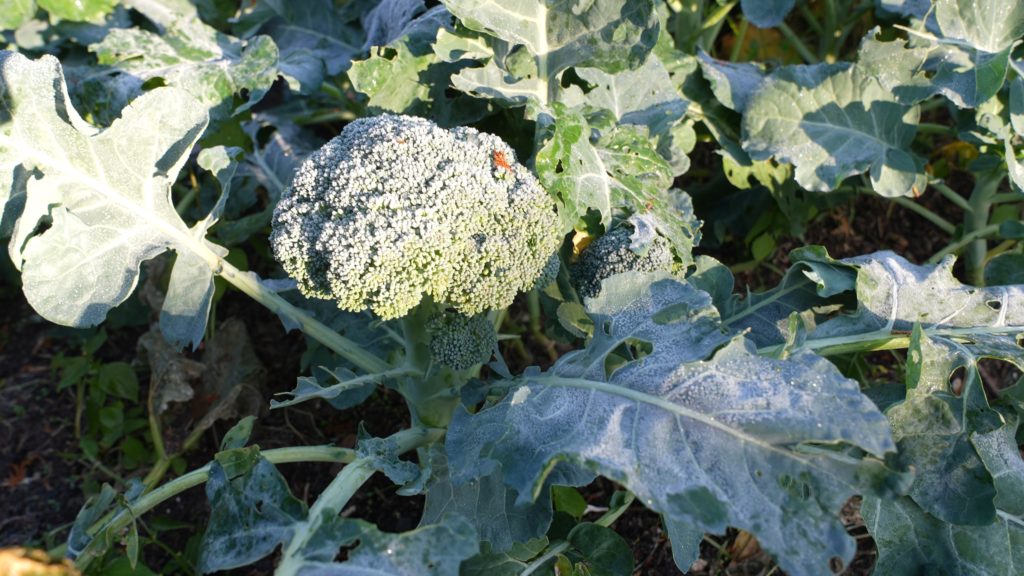
My broccoli, which I planted in the fall for the first time because of a tip from a farmer friend, was virtually pest-free as a result. I got over 21 pounds there.
I grew some new crops that went well, too: radishes, sweet potatoes, blackberries (Prime Ark Freedom and Prime Ark Traveler), jalapeño, and a new variety of cherry tomato, Montesino, which is a keeper. I got better yields on some old standby crops, too: carrots especially, which I feel like I finally got the hang of. I also switched from June-bearing to the ever-bearing Tri-Star strawberry, which I enjoyed more.
As far as infrastructure, I built one new bed, which you guys saw in my YouTube video.
And as far as harvest numbers, I got a total of 374 lbs of produce, which is about half as much as I usually get. That being said, 374 lbs is still amazing, and it roughly adds up to over $1000 USD in organic produce!
What Can Be Improved?
The next question I like to ask myself is, “What Can Be Improved?”
For me, last year was a really tough year. I was actually on and off a (hands-free!) crutch most of the growing season, which made it really hard to get around in the garden. Really, get around everywhere, even in my house!


I didn’t get to my succession plantings, which really hurt my yields. There were some crops I should have planted less of (beets and cantaloupe). And there were some full sun crops—peanuts and basil—that I planted in areas that had too much shade. I had some snafus with my irrigation which caused a complete loss of two crops I DID manage to succession plant, my second planting of carrots and cucumbers.
For me, I think the story of last year is that I didn’t spend as much time on the garden as I was hoping or planning and so that’s one thing I really want to improve this year.
2. Garden Goals
That brings me to the next step: garden goals!
So I kinda tricked you guys. If you were following along and wrote down what went well and what can be improved, you’re already half of the way to figuring out your goals for the year. Half of the plan will be to do more of what went well and improve on what you identified.
Another question here to ask, is what are your general gardening goals? And what garden projects can help support those goals? It can be as simple as having more pollinators in your yard, gardening more with your kids, or finally growing a real tomato.
Better Use of Space
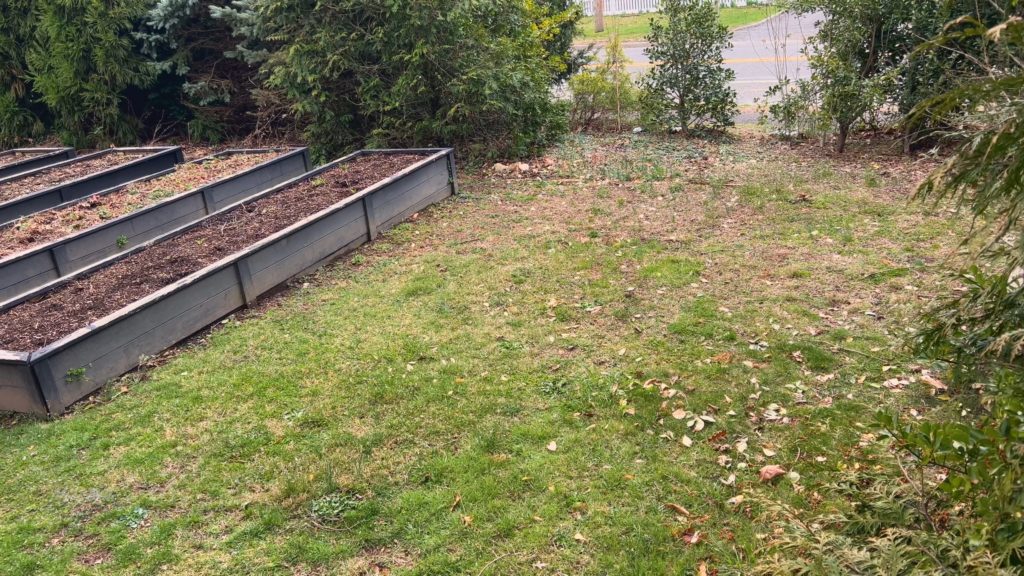
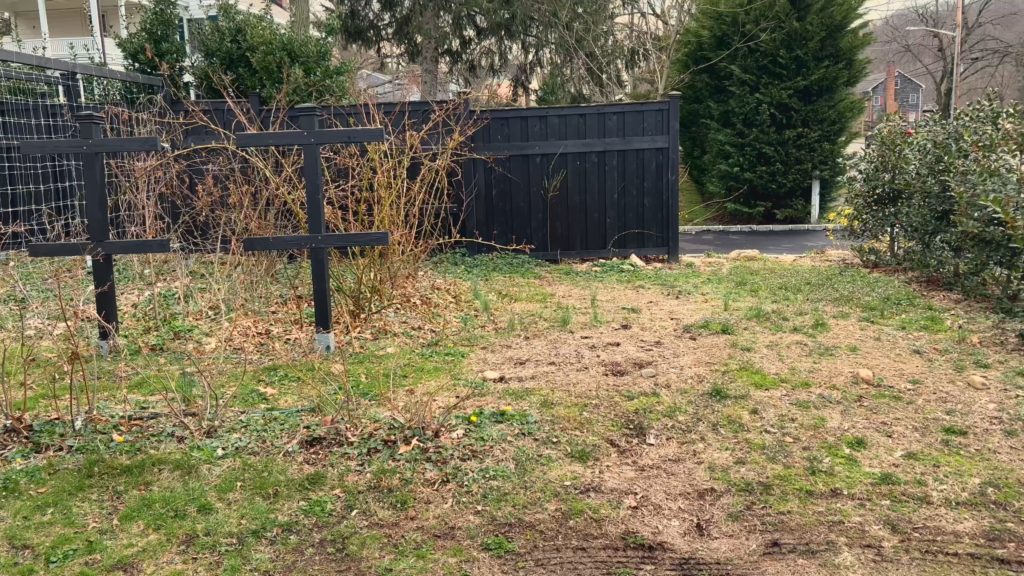
One of my main goals this year, because I have a small garden, is to take better advantage of the existing space I have. For me, that means more densely planting my perennial bed, finally installing the two beds I have planned for the empty space in the front garden, and finally planting raspberries and building and installing the trellis I had planned for the empty spot in my vertical garden area.
Increase Crop Yields
My other goal is to increase my crop yields. I want to stay out of the grocery store and grow, as much as I can, all the fruit and vegetables and herbs for my household. For this, I go back to my planting and harvest spreadsheet and fill out how much I want of each crop. This is a tip I picked up from the book The Market Gardener by Jean-Martin Fortier. It’s meant to get farmers thinking about how many bunches of carrots they want to sell, but it’s equally as important, if not moreso to home gardeners I think.
For the most part, I go off of my previous year’s number of plants and increase or decrease based on how much I got last year. If you haven’t done this for your garden before, the best way to come up with the initial numbers is from your grocery store receipts or shopping list or weekly menus.
If you’ve ever thought to yourself, wow I’d love to have a green smoothie every day for breakfast, or I’d love to have a hot vegetable every night with dinner, this is the time to make those diet decisions. Like, for the whole year…. Yeah, no pressure!
As terrifying (terrifying!) as this sounds, this yield-goal tip was a game-changer for me because it forced me to make menu decisions in the beginning of the garden season, not after I already had 50 lbs. of zucchini and no actual plan for them.
Year-Round Greens
One of my main menu goals this year is to have enough greens all-year round for a salad a day for two people. I definitely did not have enough fresh greens last year.
Daily Fruit Harvest
I’m also trying to eat more fruit, either fresh, dried, frozen or canned, so that’s another goal, to be able to keep us in fruit all year-round. For that, the new raspberry bed is gonna help and I’m planning to add figs and an extra bed of ever-bearing Ozark Beauty strawberries.
1-2 Stir Fry Bags Per Month
We eat a lot of stir fry, so I try to plant enough for 1-2 freezer bags per month of mixed vegetables like onions, bell peppers, broccoli and carrots.
Food Security
Also, I don’t know about you, but my harvest goals have changed a bit since the pandemic, since I’ve noticed that some things are getting harder to find. Organic onions and kale, for some reason, I’m having real trouble with lately.
And I almost didn’t put potatoes in my garden plan this year because they’re so cheap at the store, but I actually recently read an article that said that there might be a shortage of potatoes this year, so this is something I’m definitely planting now. I’m also hoping to plant peanuts and portabella mushrooms and expand my perennial vegetables and herbs this year.
There’s so many different goals you can have for your to garden. I’ve shared mine Now let’s hear yours! Share with all of us down in the comments so we can get more ideas.
3. Survey
So have you finished your tea yet? Let’s go outside and take a peek around and see what we’re working with. This survey step will still help you figure out where the best location will be for your beds and different crops, so stay with me here.
If you don’t have any garden beds yet, no big deal—check out my raised garden bed build video.
Make a Map
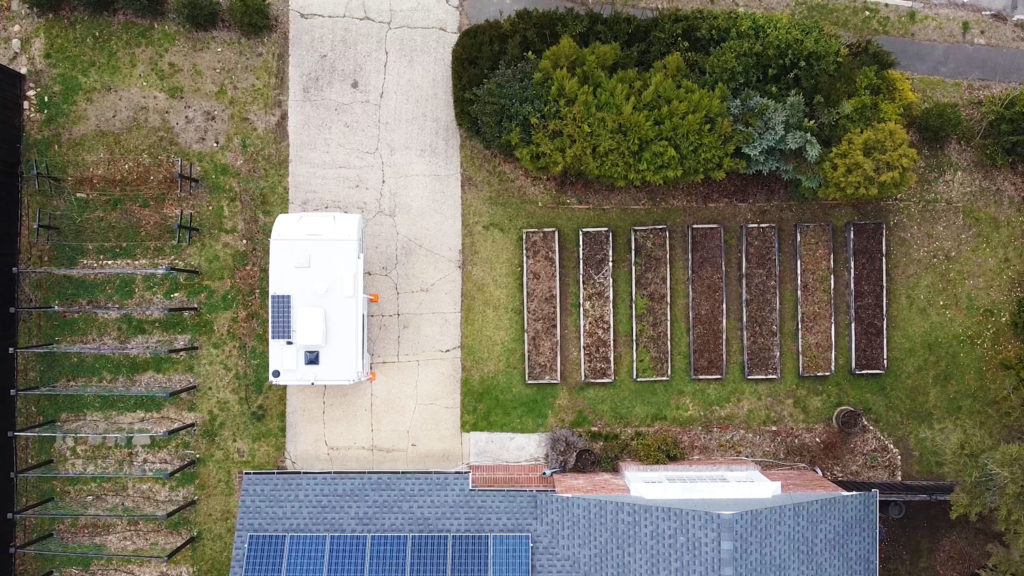
If you don’t already have a map of your property, now’s the time to draw it out.
Make sure you have the exact dimensions of the beds because we’re gonna need those to figure out how many plants to plant and seeds to start.
Name the Beds
I’d recommend naming your beds. This has really helped me refer back to them in my spreadsheet and my garden journal. For my front garden, they’re numbered left to right, and in my trellis area on the side of of the driveway, they’re lettered from front to back.
Label the Shade
Another thing to note on your map is the shade areas.
I’m in the northern hemisphere, so I get shade at end of my beds in the late afternoon because of my street-side hedges. I really need to trim these trees down this year, so I’m gonna add that to my task list!
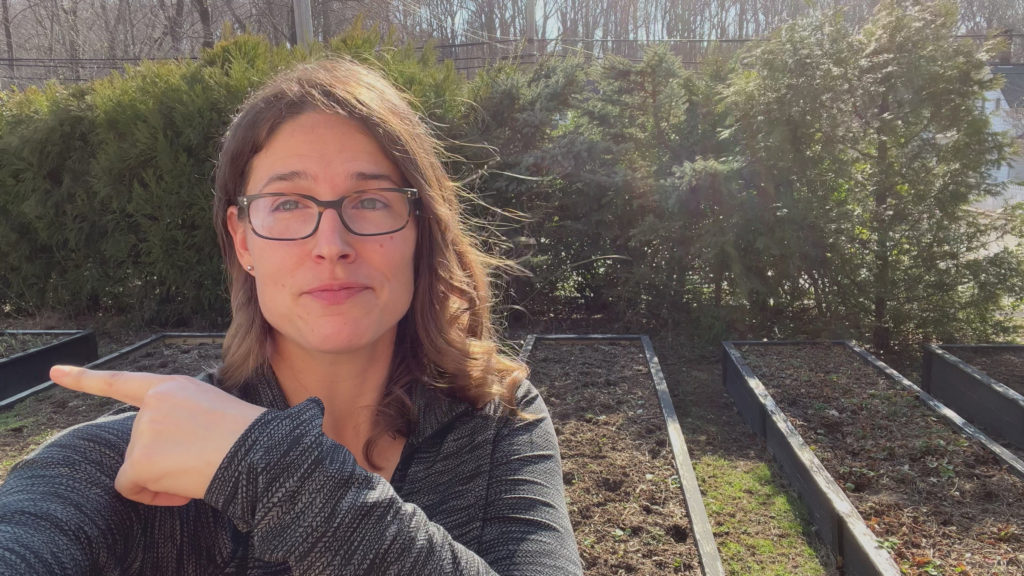
The fence in my trellis area casts shade for most of the day, and is the reason my peanuts didn’t do well last year. And because of where the sun is, the back trellises get shaded by the ones in front of them, so I need to keep that in mind when I’m deciding the crops.
Label Vertical Garden Areas
Also label the areas in your yard you have or want or have vertical crops. Ideally, run your trellises north to south, and if you have to do east to west, put them on the northern side of your garden so they don’t block other plants.
Because my garden is in the front yard, I’m keenly aware of what vertical trellises look like—usually pretty junky. My first garden beds in my front yard had trellises. And even though I tried to make some really nice wood ones, I found I just did not like how it looked from the street, blocking my big picture window.
So that’s when I decided that this area on the right side of my driveway was gonna be my vertical garden area.
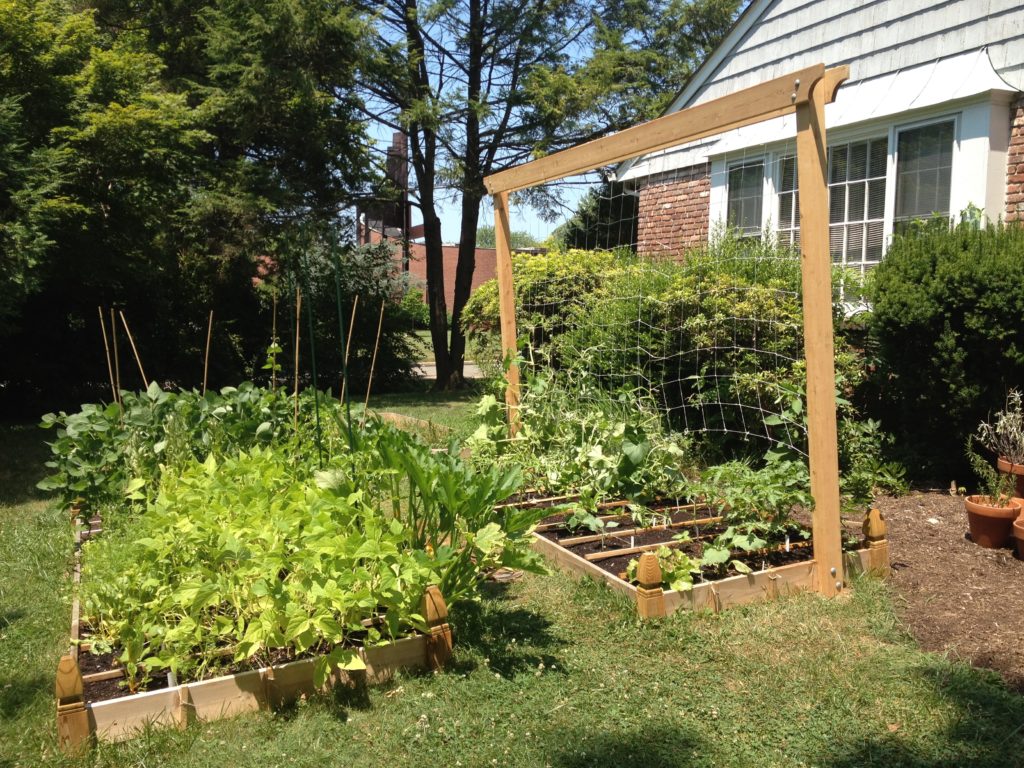
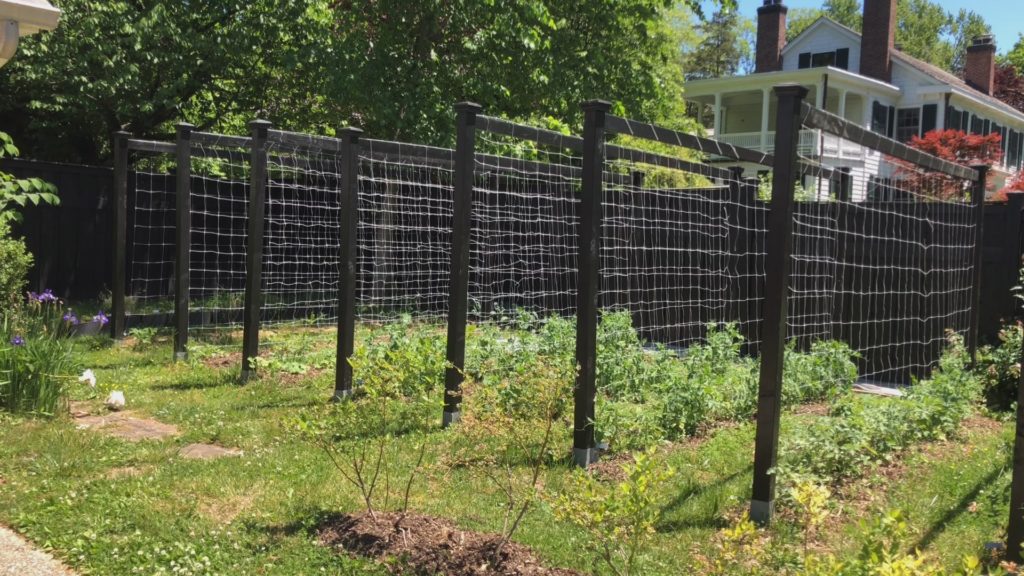
I made a tutorial on how to build my vegetable trellises if you want to check that out!
Label Different Soil Types
Some other things you might want to note on your map is if you have soil of different types (say, one area that’s extra sandy or wet).
Label High-Traffic Areas
If you have high traffic areas label those, too. For me, that’s along the street sidewalk, driveway, and my front walkway. I try to put my more attractive plants here, and plants that are less likely to be ruined by an errant footstep, tire, ice melt, or peeing dog.
A couple years ago, I tried to plant the sidewalk strip with strawberries and that was a disaster for that very reason. The strawberries just could not withstand the abuse.
Label Existing Plants
If you have perennials or existing annuals, label those. For me, that’s my blackberries, strawberries, blueberries, my entire perennial bed, plus some fall-planted garlic and onions.
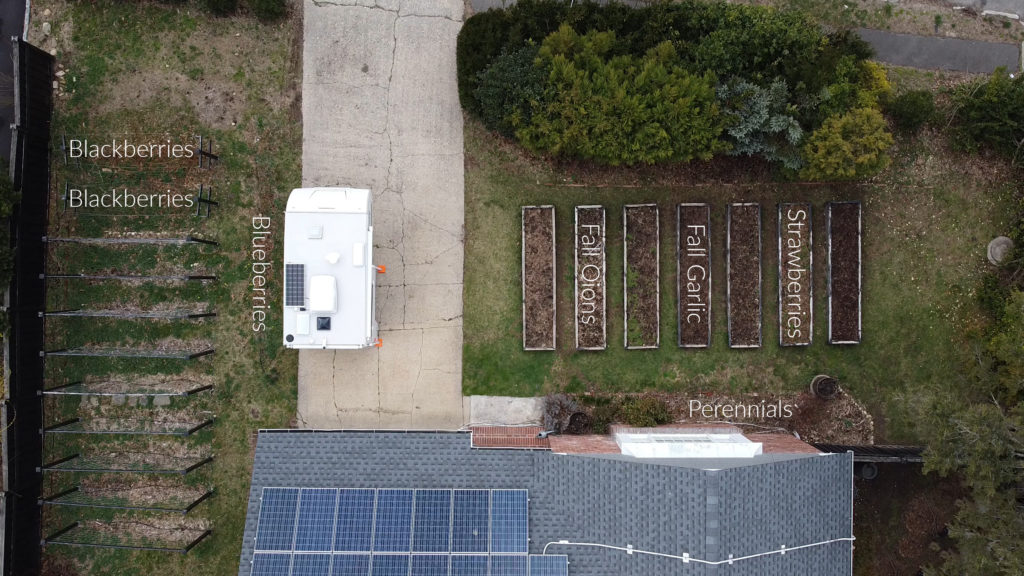
Ok, so now that we’re armed with all this data about our yards, and our goals, and wishlists let’s go back in and talk about growing seasons.
4. Growing Season
To help us nail down our garden plan, we need to define our growing season: how long we can grow and when it stops and starts.
Frost Dates?
The first component to this is gonna be the last frost date in the spring, and the first frost date in the fall. All the days between that are frost-free days and for most of us, that’s our growing season.
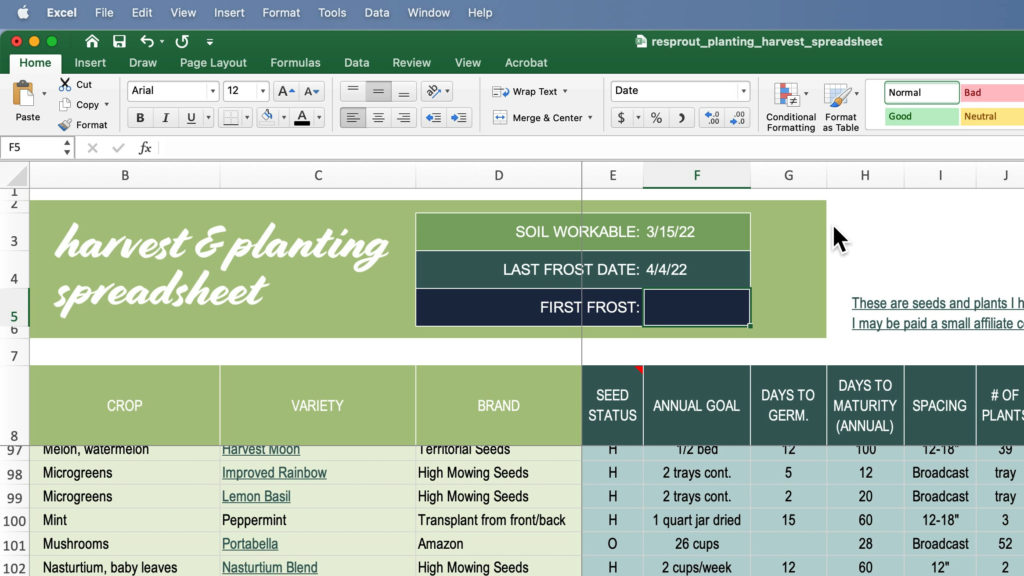
So on my planting spreadsheet here, I input the first and last frost date and this does a lot of heavy lifting for me as I’ll show you soon.
Season Extenders?
So once you know your first and last frost, the next question is do you want to use season extenders? This year, I’m planning on making some more permanent glass cold frames to help me with my year-round greens goal. And I usually use row covers in the spring and fall to push the frost out a couple degrees. Hoophouses and greenhouses are also other forms of season extension. Depending on where you live, how you’re protecting, and the crop varieties you choose, you can add weeks, even months to your growing season.
Succession Planting?
Another thing to consider is succession planting, or planting more crops once you’ve harvested one set. This is something that’s a bit overwhelming, so I don’t usually recommend it for beginner gardeners. It is perfectly ok to plant once in the spring, harvest all summer, and let your garden peter out as fall approaches.
But if you’re looking to level-up your garden production, this is the #1 way to do it. It takes no extra room to simply fill the space left by your spring and summer crops.
This year, I want to do a lot better with my succession planting to take advantage of extra space. Zucchini and cucumbers I like to do succession plantings of because disease usually takes the first crop before the end of the season.
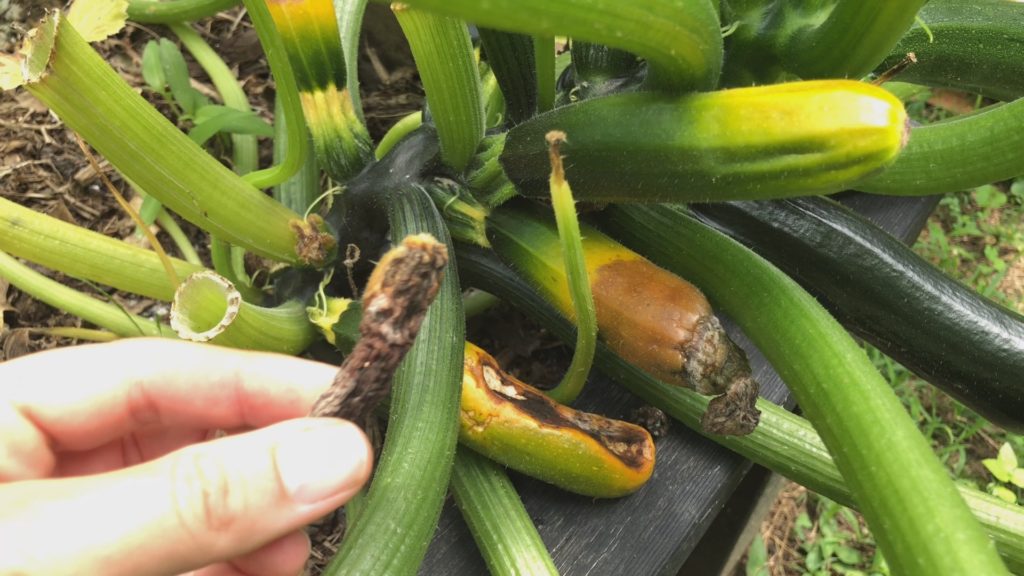
And then other crops like carrots and potatoes and greens, I like to squeeze extra plantings in just because I harvest these so early in the year and always need more of these. I like to do fall broccoli after harvesting garlic in the summer. And this year I’m gonna try doing green beans after spring snow peas.
I’m still trying to come up with other great succession combinations. If you have some favorites, leave them down in the comments below!
5. Plug In Your Crops
Ok, this is the fun part guys. And because you’ve done all the hard work of getting your map together and deciding your season length and goals, this should be easy. You can use a notebook or piece of paper, but I actually do this with, drumroll please!
…with a spreadsheet.
This is the same spreadsheet I showed you guys earlier.
Copy Over Last Year’s Crops
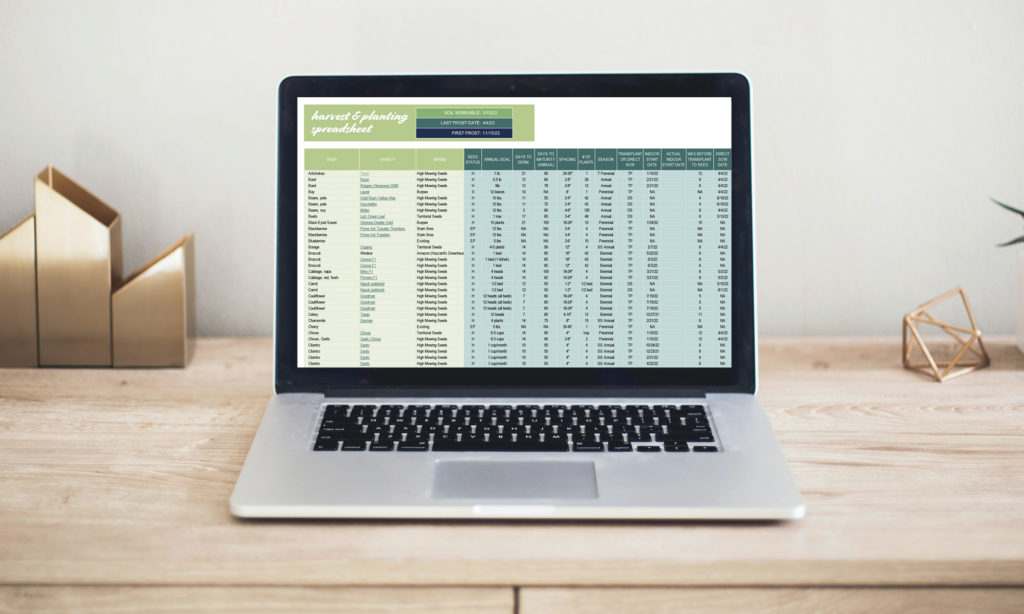
I list all my crops here on the left. I would say 95% of these are the same crops I grew last year, maybe not the same varieties, but the same crops.
What’s great about using a spreadsheet is I just copy over last year’s sheet, so it’s quick. And then I just add the new crops at the bottom.
Crops to Delete? Check With Family!
And then, boys and girls, here’s another important lesson I learned the hard way. Ask your family what they do and don’t like! A few years ago, I planted a whole bed of beets. Turns out the hubs doesn’t care for beets all that much and that caused a real cooking issue.
So, as much as I personally like some of these, I’m going to delete and adjust my yield goals for some of these hubs-unapproved veggies. (I do think I can squeeze some of these into dinner, though and he won’t notice. Shhhh)
So, what we have now is this beautiful list of all the crops that are going into our garden this year. The next step is deciding where to put them.
Existing Plants
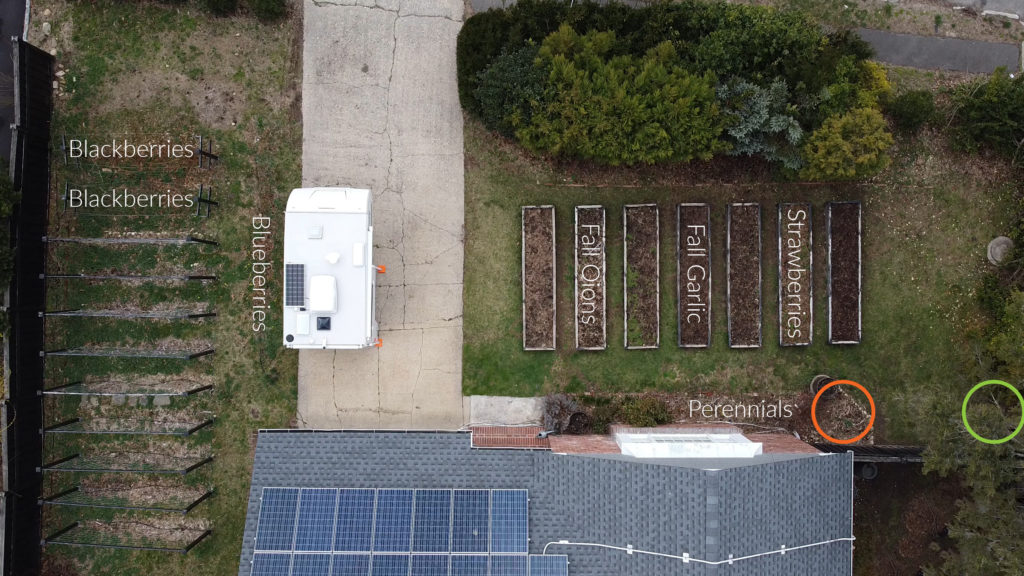
First I put the existing plants in their proper places. I plug the bed names into my spreadsheet in the “location” column, which makes for easy sorting later.
Highest Priority Plants
From there I tackle the highest priority plants first, so those go in the best places and don’t get forgotten.
Highest priority is always tomatoes, so those go over in the trellis area, and I usually do four trellises. I’m gonna put them in the most southern trellises, which get the best light.
Other Vertical Crops
While I’m in here, let’s do the other vertical crops, so for me that’s raspberries, cucumbers green beans and peas.
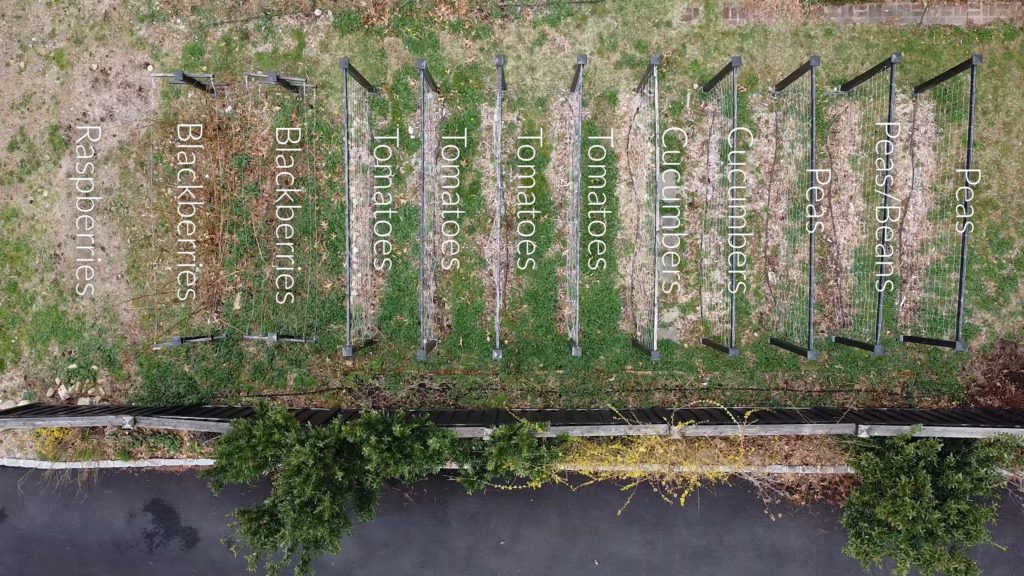
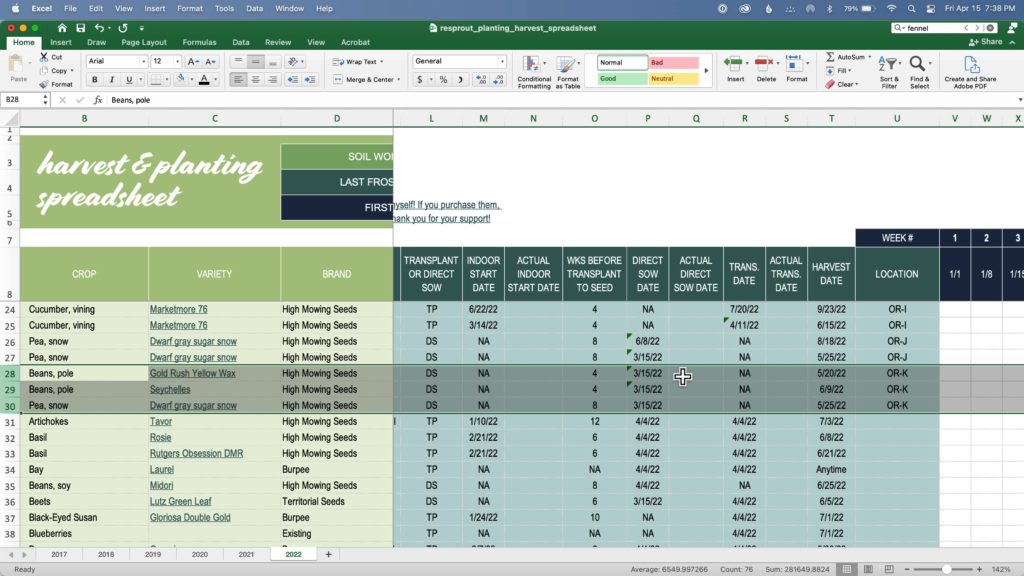
Notice I’m putting pean and pole beans in the same bed. This is where using a spreadsheet instead of a map really helps, because I can easily keep track of the fact I’m planting beans after the peas, just by changing the direct sow date. And the spreadsheet tells me when the peas will be ready to come out, so I can easily copy that date, and the spreadsheet will update the harvest date on the second crop, the beans.
Greens
Another high priority for me are greens, so I’m gonna plan for 1 full bed of salad and cooking greens.
Also, remember that shady bed by my fence? It’s not the best spot, but the thing that would thrive there the most is greens, so I’m gonna put more greens over there. I’ll consider those “bonus” greens. I’m not gonna depend on ’em.
And if you guys have seen my broccoli leaf harvesting video you know I love my broccoli leaves, so that will supplement my greens bed, too.
Perennial Bed
Two more goals of mine were more perennials and herbs and to better plant my foundation perennial bed. I’ve always shied away from mixing perennials and annuals, but I think, this year, I’m gonna put all the herbs, perennial or not, in the front foundation bed. That should save me some space in my regular beds and keep everything organized. We’ll see how it goes.
And this is where I’m gonna add the fig tree and at the end of it, an artichoke plant. I’ve never tried these before. I’m super excited.
“Miscellaneous” Bed
Another easy bed is what I call the “miscellaneous bed.” It’s basically one bed with a little bit of everything. If I only want a few plants of something, it goes in here.
Succession Crops
Next up is planning the succession crops, the crops that go in after other crops.
In the case of my edamame, I’m gonna make it the spring crop right before one of the fall broccoli beds.
I’m also gonna do a second carrot sowing, a second potato crop, fall-planted onions and garlic, which will all go in beds already assigned.
For greens, I plan on doing multiple sowings in the my one greens bed spring through fall. And then I plan on making my trellis area into a greens planting area over the winter with some glass I have saved up.
Flip Beds?
Once you got everything assigned the right amount of bed space, check to see if you need to flip any of the beds around. You might want to do this if you planted the same thing in that bed last year, or, in my case, beds 8 and 9 don’t exist yet.
So I’m gonna move around the beds so that I don’t have spring crops planned for those two beds. I’ll make those two my melon and miscellaneous beds, since those don’t get seedlings for another month and a half. That should give me enough time to finish the beds.
Seedling Numbers
The last thing we’ll want to do is fine-tune how many plants or seeds we need based on the dimensions of our beds. So for instance, this new strawberry bed here. Strawberries need 12″ spacing in raised beds, so 1 every foot. My beds are 14’x3′, so that comes out to 42 plants.
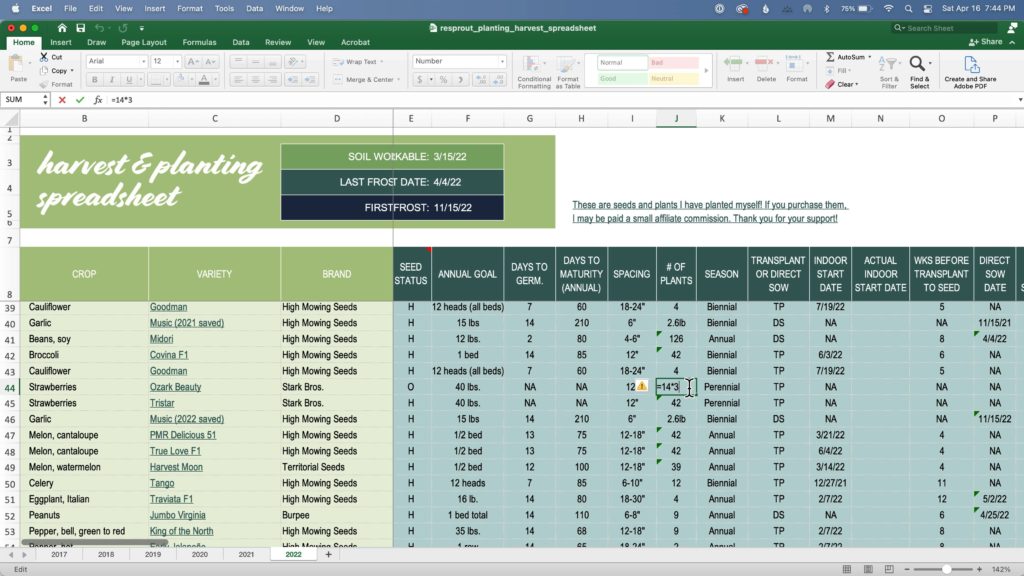
Now that we have everything mapped out, it’s time to go shopping!
6. Choose Your Varieties
I always start shopping for seeds in my own seed collection. I would say the majority of what I grow is seeds that I’ve grown in the past that I’ve liked.
I keep the brand name and variety in the spreadsheet so I remember. And I’ll even make notes about the variety in the spreadsheet and put a link to the product page for easy reordering and checking on planting details. What’s great about keeping notes this way, is I can look back at my old sheets from past years and see my notes on other varieties I’ve tried.
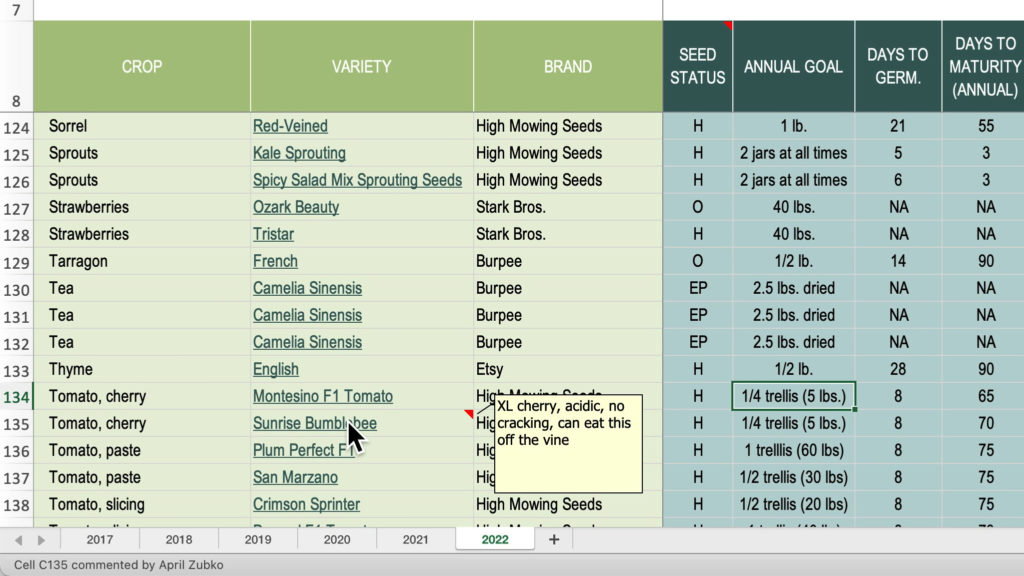
If the product page or seed packet has it, I fill out dates to maturity, the weeks it needs to be started before transplant, spacing and other info.
If you’re looking for more general crop data, not specific to the variety, you can download a PDF chart with this info for all the top edible crops.
Now because this is a spreadsheet, I actually programmed this thing to take this all this info and tell me when I need to start a specific seed based on my frost or planting date, and what date I’ll be able to harvest based on the dates to maturity.
And I enter the weights of everything I harvest in each week, so it is a great record of how much I harvested (or didn’t harvest) and exactly when, which helps me time my harvests and quantities better the following year.
Last year, I even made a new column with the going price, per pound, of the different crops so it even tells me how much my blackberries were worth. Turns out quite a bit!
This is really good if you have spouses that claim you spend too much money on your garden.
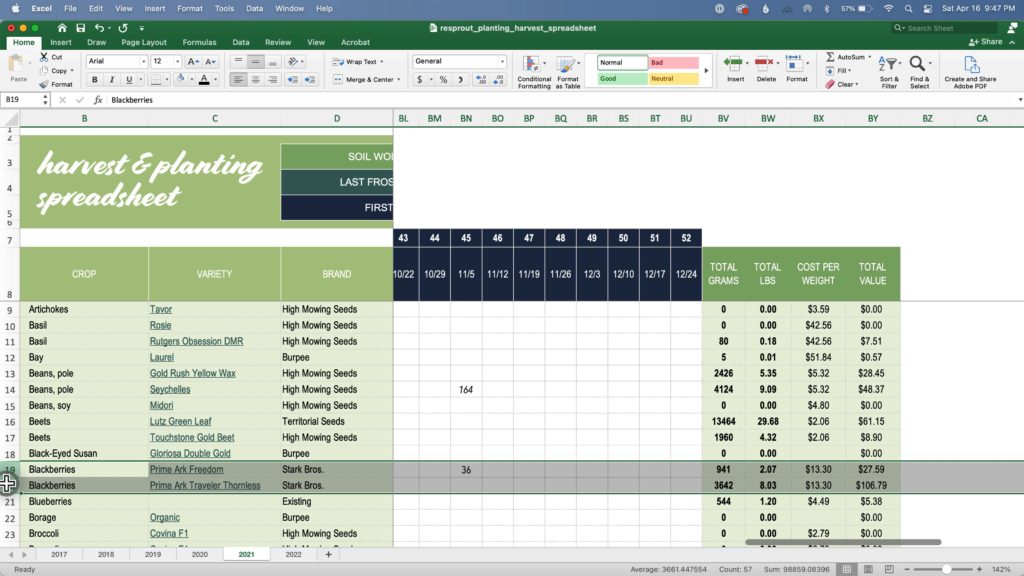
This spreadsheet, as long as it took me to set up, was worth every hour, because, seriously, it answers about a billion questions for me about my garden and it helps me time everything better, and better fine-tune the quantities more and more every year.
If you want your own crazy garden nerd spreadsheet to do all the heavy lifting for you, you can download your own customizable copy.
Seed Shopping Tips
Now once you have an idea of the seeds you want to plant that you already have, it’s time to fill in the gaps. Here’s the seed shopping tips I promised you guys at the beginning of this post!
1. Solve an Issue
If you’ve had specific issues in the past, try varieties that deal with those issues. A good example for me is tomato cracking. This year I’m trying two new varieties, Crimson Sprinter, which has thick skin, and Rutgers, which resists cracking.
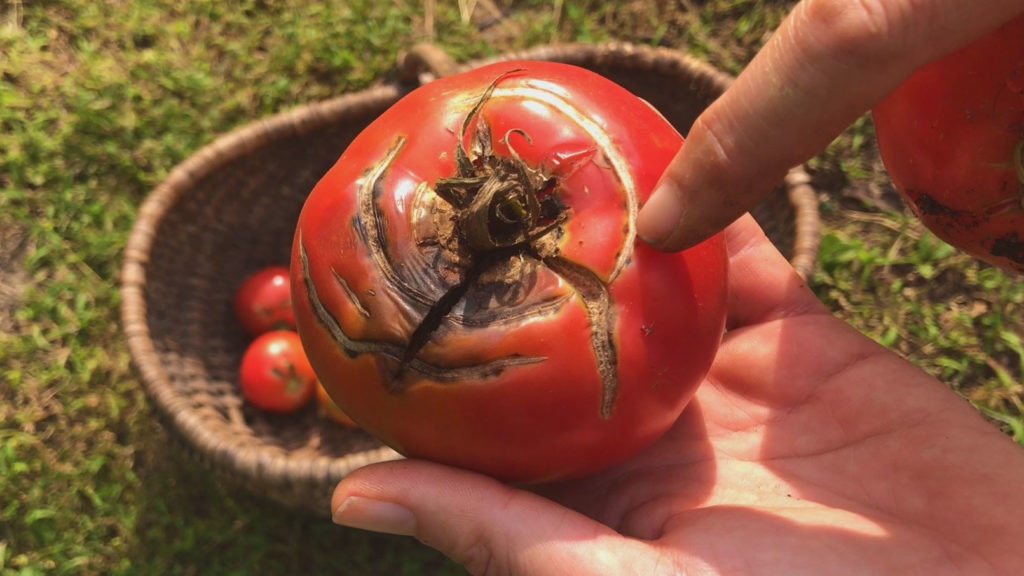
Most crops have varieties that resist specific diseases. In my experience those are worth every penny if it’s a disease you struggle with.
2. Shop By Season
If you’re trying to plant things outside their normal growing season, look at the variety name for clues.
For example, this year I’ll be planting New Red Fire lettuce over the summer. It’s bred to resist bolting and tip burn.
Cold hardy varieties might have words like “Hardy,” “Winter” or “Russian” in their names. These three varieties—Giant Winter Spinach, Winter Density lettuce, and Evergreen Hardy bunching onions—I’m planting in my winter garden this year.
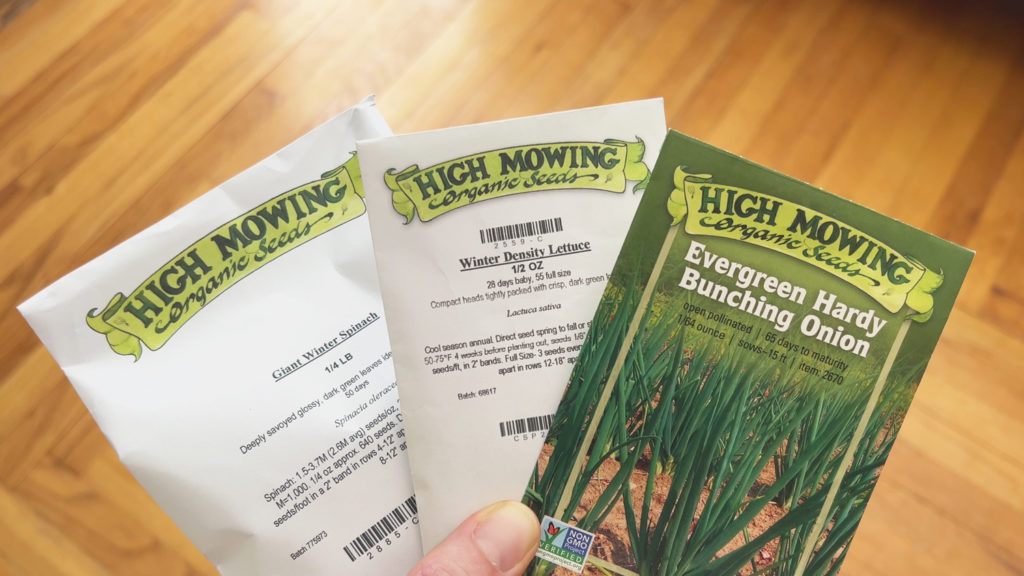
If you’re looking for something that you can harvest quickly, remember to check for “days to maturity” in the seed info and compare it against other varieties. Sometimes quicker varieties have names with words like “First” or “Early” in them.
3. Shop By Harvest Window
Some varieties have information about how long they will stay fresh in your garden once mature or how long they will produce. Look for phrases like “harvest window,” “field holding,” “overwintering,” “indeterminate,” “determinate,” or “ever-bearing”.
Many crops like greens, zucchini and eggplant can be harvested in baby form and mature form. Peppers change color and can be eaten green or red or anything in between depending on your taste.
A “long harvest window” is good if it’s something you want to eat fresh and simply leave in your garden until you’re ready to eat or process it. Lettuce and herbs I like to have a long harvest window since I like to eat small amounts the day I harvest them. Peas, and edamame (soybeans) I like to have a long harvest window, too, because I find it hard to shell a lot of peas at one time. (This post on edamame harvesting explains a little more why!)
On the other hand, if you’re doing a succession planting immediately afterwards or have a big preserving day, you might want all the vegetables to be ready at the same time so you can pull the entire bed at once.
3. Shop by Open-Pollinated/Hybrid Status
Open-pollinated seeds are seeds you can save and will stay true to their parent seeds. Hybrid seeds won’t, but they’ve often been specially bred for various purposes, which might be worth the extra cost.
I usually try the open-pollinated ones first and then switch to hybrid if they don’t perform well.
4. Make A Shopping List
As I find the varieties I want, I write them in the spreadsheet and add a link back to the product page. Then, when it’s time to place my order, I sort the spreadsheet by seed status (N for need), and then by brand. Then is takes just a few minutes to go to each product page, add it to my cart in the numbers I already figured out…
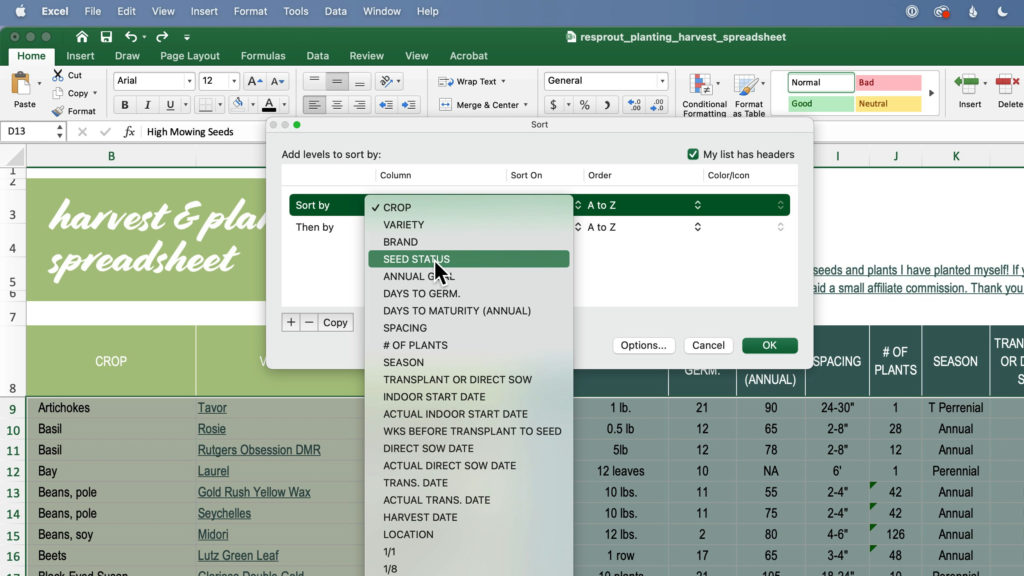
…and BAM, garden plan done for the year!
I hope this post helped you out. Remember to sign up for my email newsletter for more garden resources.
Keep gardening like a boss and I’ll see you guys soon!


I would like a few comments about planting asparagus in Wisconsin =
Thanks!
Hi Jim, I haven’t planted asparagus before. I’d like to though! It’s a great perennial crop and asparagus is so expensive. Asparagus grows in zones 2-11, so you shouldn’t have an issue with in there in Wisconsin. Just double check the variety. Not all varieties are zones 2-11. Mary Washington I know is zone 3-8. That’s the one I was planning on planting when I finally got around to it. There never seems to be enough time!