If you’re new to starting seeds indoors, the huge supply list and supposed “rules” for good growing can be a little intimidating.
Today I’m going to show you my best seed starting setup, my favorite tools and boil it down to the basics—the things you ABSOLUTELY need, the things that are NICE TO HAVE and things that everyone tells you need, but you don’t really need for a cheap DIY seed starting setup.

Seeds
Let’s start with the obvious one. You need seeds. Sorry guys, can’t get around this one!
If you’ve come this far in your gardening journey, you’ve graduated from buying plant starts of unknown varieties from unknown companies, and you want a little bit more control over your garden.
Buying seeds allows you to pick the flavor, color, disease resistance, and planting time, not to mention it saves A LOT of money.
I try to grow using organic seed as much as possible, so my favorite herb and vegetable seed companies are High Mowing Seeds, Territorial Seed, Johnny’s Seeds, Botanical Interests and Stark Bro’s for potato seeds, garlic seeds and sweet potato slips. You can always get seeds at your local garden supply center, home improvement store, or even Amazon or a dollar store.
Of course I have my favorite seeds (doesn’t everyone?), but I am ALWAYS looking for new varieties to try. If you got an awesome one, let us all know about it in the comments, along with your zone or climate.
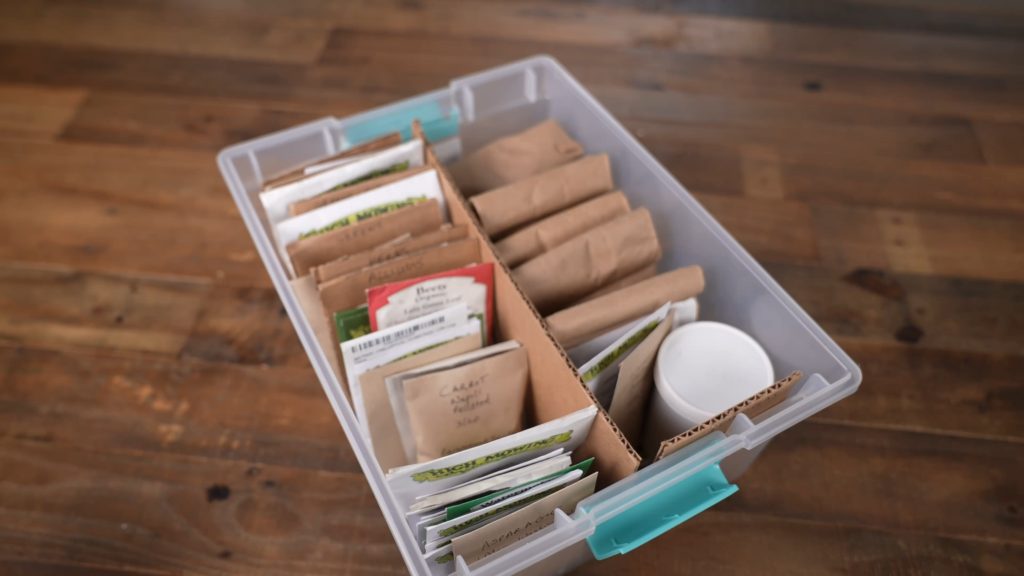
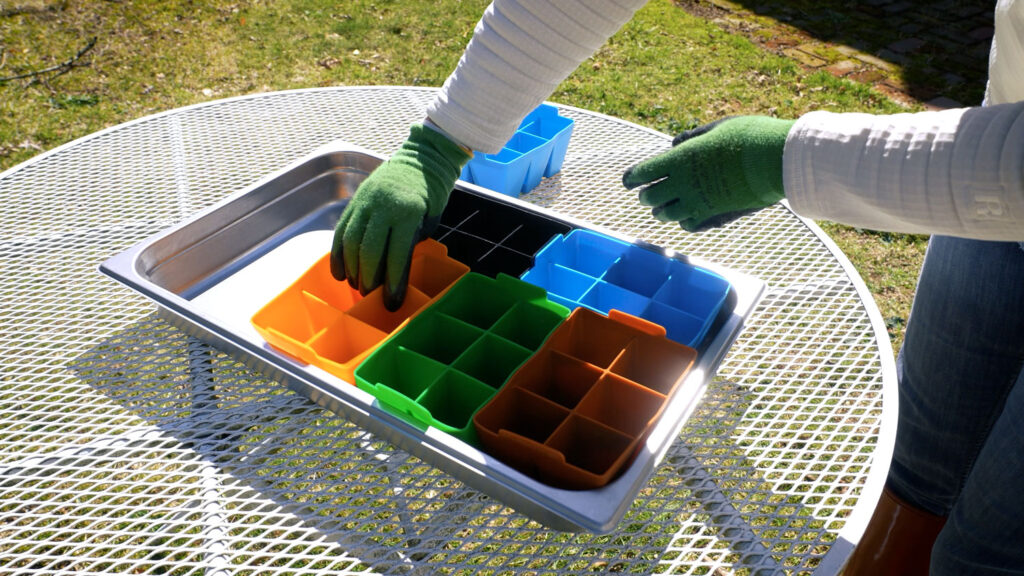
Seed Organizers
Speaking of seeds, Here’s one thing you DON’T need. You do not need a fancy seed organizer for your seed packets. You don’t even need ANY kind of organizer. You can throw all your seed packets in a drawer like I did starting out. That being said, something portable and categorized is a nice thing to have. There’s a lot of options if you want to upgrade here.

Check out my seed organizer video where I go over all the ways, including mason seed jars, seed shoe boxes, seed binders, seed photo boxes, and a tutorial on how to make what I’m currently using, a customizable plastic lidded box with dividers.
Garden Planner
Vegetable garden planners are something that never gets mentioned in seed starting supply lists and I think that’s a real oversight. I know when I was first starting out, just the sheer amount of data was overwhelming. Gardening is a long-term project, so you really need SOME kind of plan.
It could be a sheet of paper or a notebook, with a simple list of varieties, locations and dates, or a sketch of your yard with the plants marked. There’s some nice printable garden planners and garden journals out there.
You could go with a virtual garden planner. In the past, I’ve used Google calendar and task apps like Todoist for planning my garden tasks.
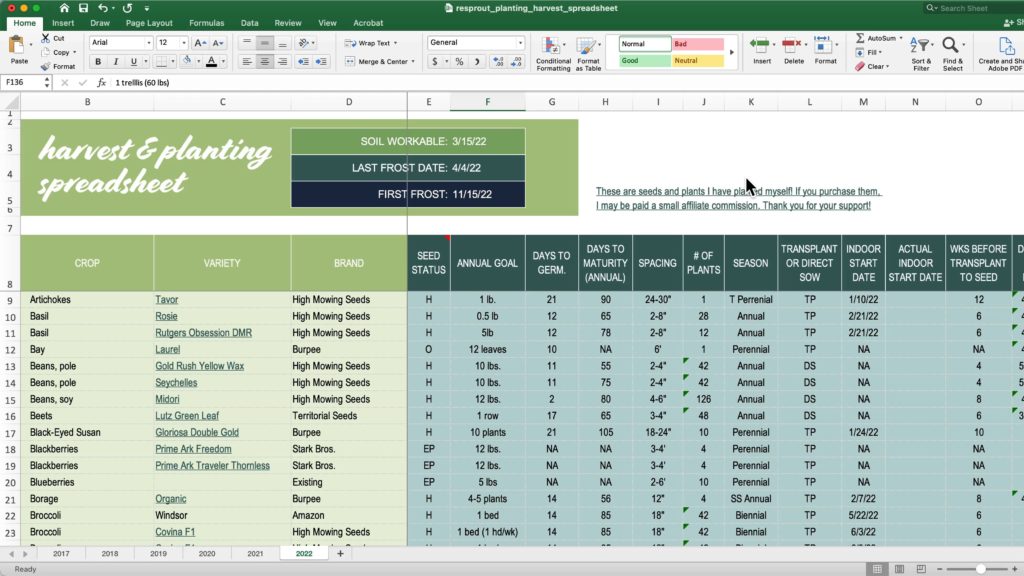
If you guys have seen my garden planning video you’ll know I’ve since upgraded to a spreadsheet to plan my garden. (Let me go get my nerd glasses!) For me, that took the best of both worlds of the virtual and the paper. It was easily editable and sortable and I could link to websites like a digital planner, but I had the ability to track more custom plant data like harvest quantities, and transplant dates, like I would have had on paper.
If you are a fellow nerd, download this garden spreadsheet and customize it for your own garden.
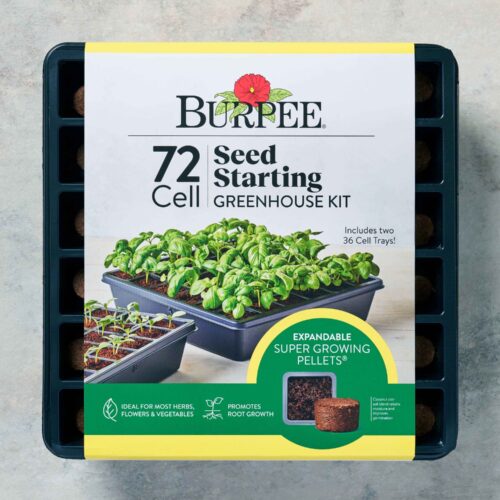
Seed Starter Kit
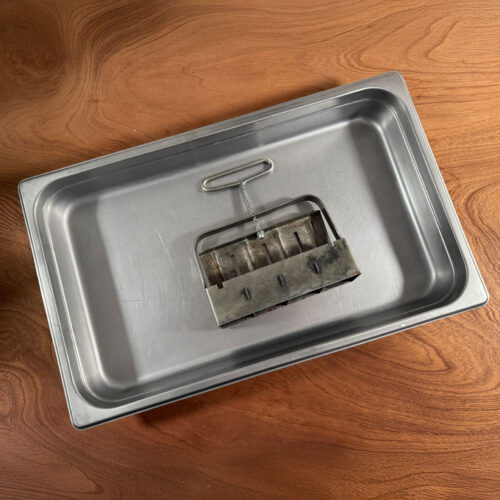
So, you got your seeds and seed starting plan. Do you need a seed starting kit? No. You CAN make your own, BUT if this is your first year starting seeds, kits are a really great way to limit a lot of stress and guesswork. That’s how I got my start. Jiffy and Burpee both make popular seed starting kits.

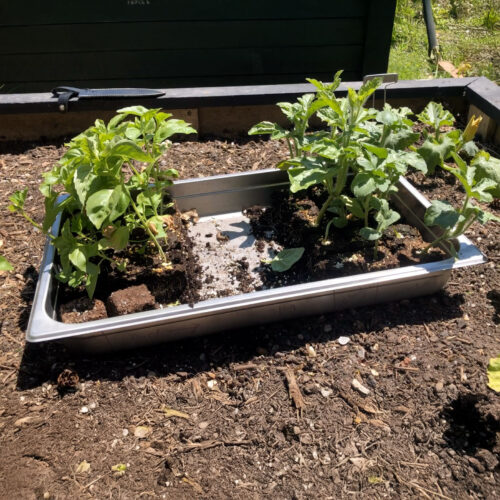
AND, not sure how long I’m going to do this, but for a limited time, I’m also offering the kit I use, a heavy duty metal seed germination kit for sale. It consists of a galvanized steel soil blocker and stainless steel trays, which I’ve had A LOT of people asking me about. They’re zero-waste and completely indestructible. I put this system together myself and it’s not sold anywhere, so I finally figured I’d offer it to you guys to see if there’s some interest. I just cannot be the only person who is tired of disposable plastic in the garden!
Seed Pots
Do you need seed pots? Technically no. One of the oldest ways to do winter sowing indoors is to plant seeds directly into wooden trays. Gardeners would sow in flats, just like they would in the garden and then simply transplant the seedlings when they grew old enough. If you’re short on pots or you’re doing microgreens, I definitely recommend giving this method a try.
That being said, I prefer separating my plants. They’re quicker to transplant and there’s less shock to the roots since you’re not disturbing the soil to dig them up.
There are a million and one ways to separate your seedlings. You can go DIY with disposable seed starter cups, yogurt cups or start seeds in egg cartons.
Plastic plug trays come in different sizes—128-cell, 72-cell, and 50-cell—and fit industry standard 1020 trays. Silicone seed starting trays like those from Sili-Seedlings or Back Porch Pots are food-grade and flexible and usually come in cool colors. There are biodegradable seed starter pots like newspaper plant pots, paper pots, peat pots, Jiffy pots and Jiffy strips, and you can even start seeds in toilet paper rolls.
If you’ve seen my hori hori and soil blocker video, you’ll know I love my soil blocker, probably the ultimate in eco-friendliness, because there is no container at all. The soil is the container. This tool is a one-time investment, and you don’t have seed starter pots to store or sanitize. Not only is there hardly any transplant shock since the roots are air-pruned, but the seedlings are still separated. So, the eco-friendly and low-cost upside of being container-less without the root shock drawbacks of sowing in flats.
So, on this supply item, I would say no, you do not actually need seed starting pots, but having some way to separate, like a soil blocker or individual pots is nice.
Seed Trays
If you got your seed pots or soil blocks, you’ll notice one important thing about them—they leak. Now drainage holes are a good thing for the plant—you don’t want root rot. This is NOT so good for your living room.
Unless you’re starting seeds in a greenhouse or some other place where you don’t care where the water goes, you DO need some sort of tray to catch all the water that’s going to drain from the seedlings.
And in fact, I highly recommend bottom-watering seedlings, which is putting water in the bottom of the tray and allowing the plants to soak it up. This is where having a tray is indispensable.

Good news is that you can go with DIY seed trays here. You can use an old cookie sheet, baking pan, or bin.
A lot of farmers and gardeners use a plastic seed starter tray called a 1020 tray, which fits plug tray inserts. I’ve used these and I’m really not a fan. They’re hard to clean, they’re flimsy, they discolor, they crack, they can even melt or warp depending on how hot your climate or greenhouse is, and they add more plastic to the world.
If you want to stick around to my next post, I’m going to go super in-depth with the complete metal seed tray system I use which I LOVE.
It uses heavy-duty stainless steel restaurant trays that are zero-waste and recyclable.
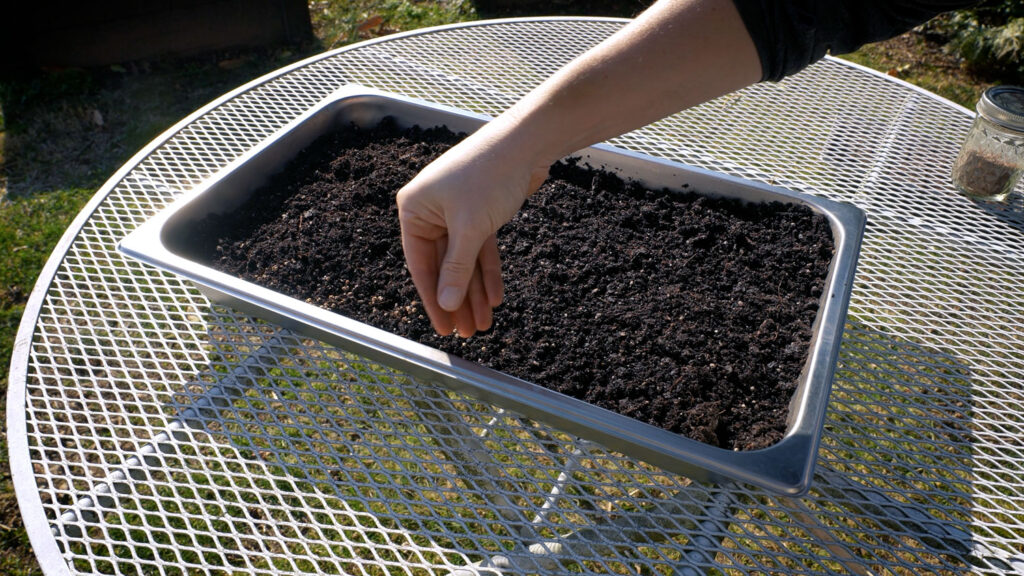
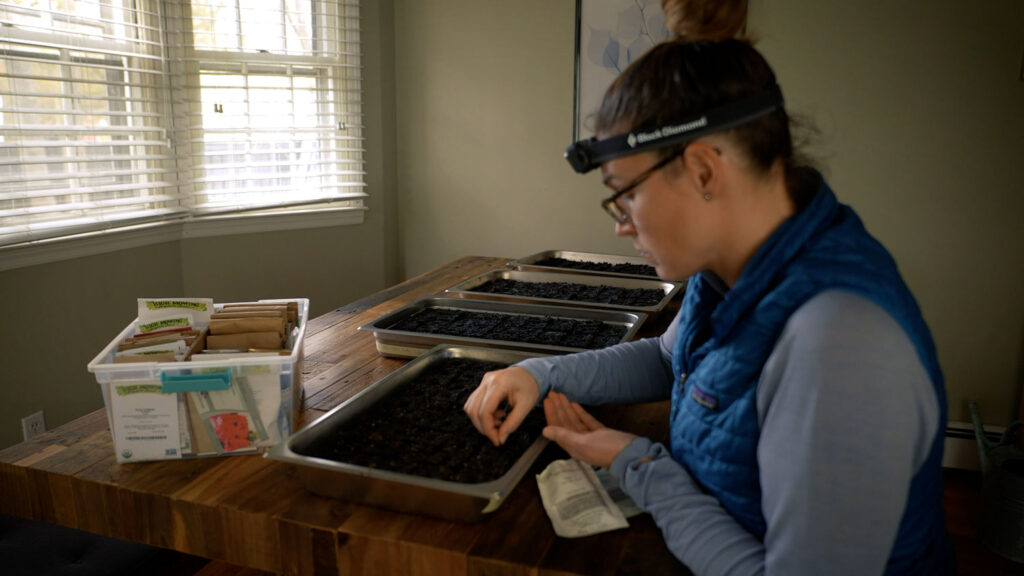
Starting Mix
So, seed starting mix. You DO need SOMETHING to put your seeds in. But this is one of those items that there is a lot of disagreement over between even experienced farmers and gardeners. Kind of like how you should make grilled cheese—with margarine, butter, oil, or mayonnaise.
Mayonnaise! Of course!
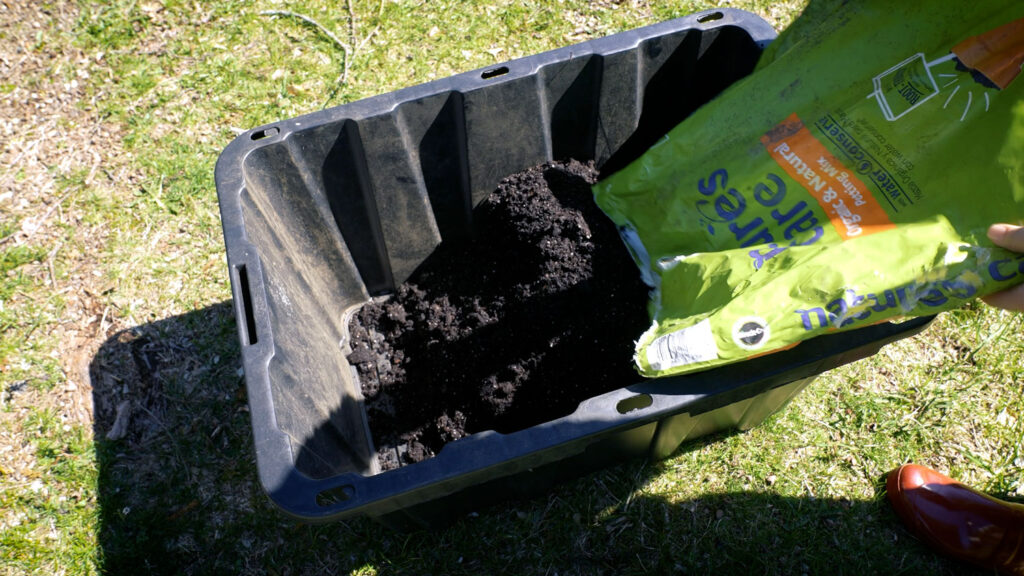
My advice would be to not overthink this. Seeds are not delicate beings here. A good seed starting soil has three features. It’s sterile, meaning no fungus, bacteria or weed seeds. It’s finely textured. And it holds water well. Because I try to keep my garden organic, I add a fourth one, that it’s organic. Almost anything out of a bag can qualify for these.
Myself, I have always had great luck with making soil blocks and seeding in an organic potting mix I get from my local home improvement store. A lot of us already have potting mix in the house, so bam, you’re done.
There are specialized soil mixes for seed starting if you’d like. Jiffy, Back to the Roots, and Espoma are popular brands.
High Mowing Seeds, where I buy most of my seeds, sells a compost they start all their seedlings in.
Two things I will tell you not to use is anything labeled “soil” or “topsoil”—it’s just too heavy, coarsely textured, and lacking in nutrients. And don’t use anything from your garden or compost pile, since it won’t be sterile.
Vegetable & Herb Plant Markers
Can you try to memorize what you planted? I guess… But I can tell you that I have tried to do this and I hated my life. Also it was very hard to track how my plants did when I didn’t know for sure what variety I was harvesting or eating. So don’t be like young Paduan April and PLEASE label your plants, someway, somehow.
Yes, you NEED some type of garden plant markers.
There’s a lot of cheap DIY plant marker options out there like popsicle stick garden labels and stone plant markers. For a couple years, I made plastic plant tags out of old cut up mini-blinds which I wrote on using a Sharpie. You can cut up big yogurt containers the same way, too. If you want to get fancy, you can buy wooden plant labels, metal plant tags, copper, or even ceramic. And if you’re using silicone seed starting pots, you can actually write on the side with a dry-erase marker.
I used to write the varieties on the side of my stainless steel seed trays with a washable crayon, but found that didn’t actually wash off too well when it sat for months and months.So, I finally settled on a two-part system. On my trays, I put a piece of masking tape on the side and write the varieties in each row.
When I transplant them, I make a clear label with my labelmaker, put the crop, variety and seeding date, and then put that on a galvanized steel marker that I can reuse again and again every year. Amazingly, I have labels for perennials that have been in my garden for years and still look like the day I made them.
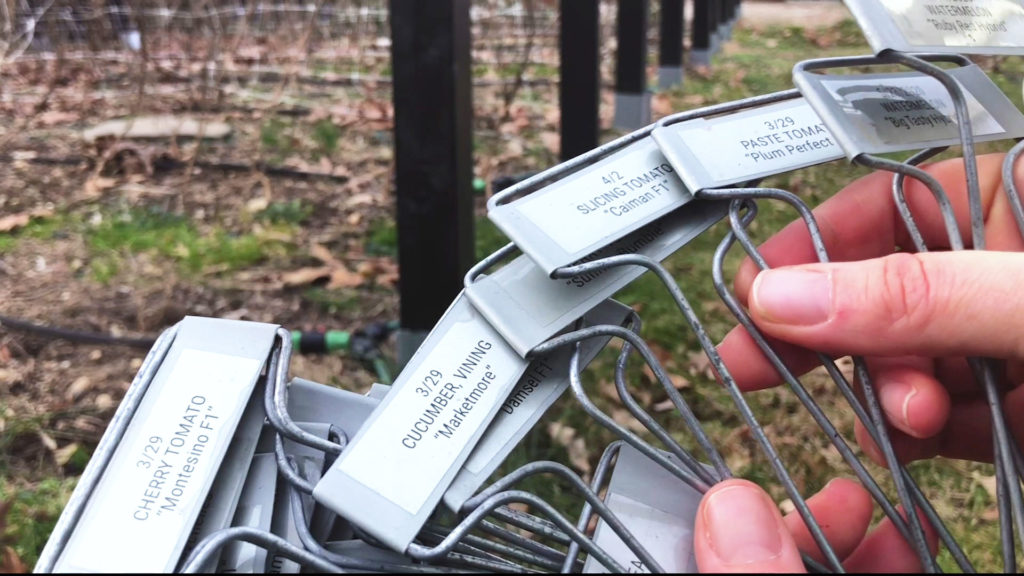
Admittedly these are a little fancy, but hey, we work hard on our gardens! We deserve a little bling! And I really love that they’re not disposable and adding little plastic pieces to my compost.
If you guys what me to do a more in-depth post on how I make and clean my markers and use them garden planning, let me know in the comments.
Seeding Light
Some seeds, like carrot and celery seeds, are so tiny, they come in a packet INSIDE the seed packet. And many can be the same color as your soil.
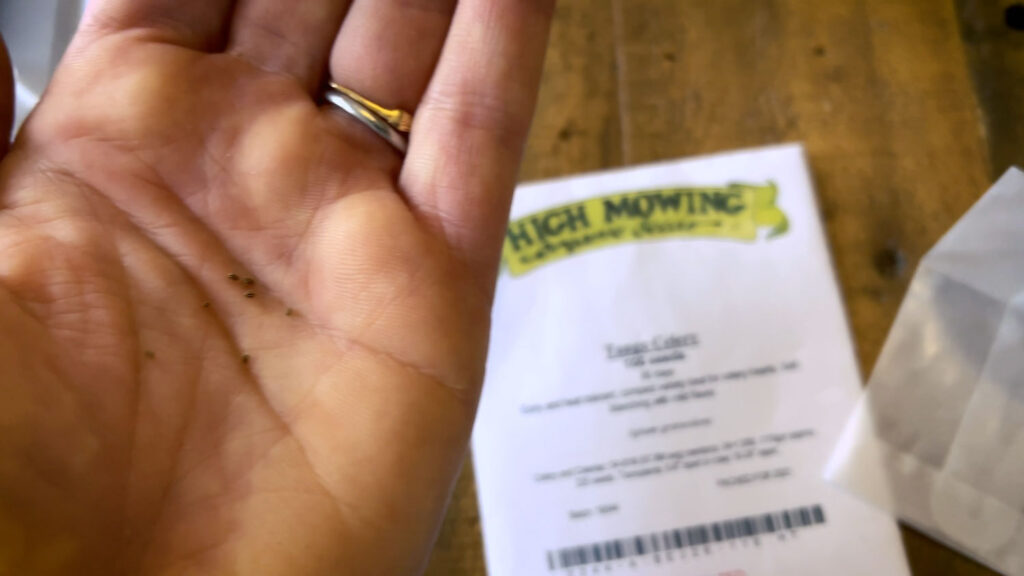
So here’s another item you won’t see mentioned in most seed starting supply lists—you need a very strong direct light to see your seeds while you’re planting them.
If you’re seeding outside on a sunny day that’s fine, but I found my dining room light was just not bright enough.
I use a headlamp now if I’m seeding indoors and this makes it SO much easier.
Plant Heating Mat
Germination mats are thin heating pads you put under your seed starting trays to help germinate your seeds. They can be on the pricier side, especially if you want to outfit a lot of trays.
Seed starter mats are one thing that many say you need, but you really don’t. Here’s why. Almost every popular crop has a germination temperature that’s in the range you would normally keep your indoor room temperature at. So if you’re keeping your seed trays in your living room, AND you don’t have a crazy spouse who likes to keep the house at subarctic temperatures, you’re fine.
Seed heater mats become a nice thing to have when you’re starting seeds in an unfinished area like me. My basement hovers between 60-65ºF which is too low for the summer crops like tomatoes, melons, and eggplants. So I have 6 heating mats to keep those seedlings happy.
If you have an older refrigerator, the tops of those are often warm, and they also make a good temporary spot to germinate heat-loving crops. Once they’ve sprouted you can put them with your other trays in a cooler area, though they won’t grow as fast as they would with a mat.
If you’d like a printable guide of all the popular crops and their germination temperatures, along with seeding and transplanting dates, you can download one for free.
Indoor Watering Can
A watering can for your plants is another thing that’s nice to have but you don’t need it.
I use my Haws watering can for this task, but chances are you have something around the house already, like a milk jug, pitcher, or large measuring cup, that can transport and pour decent quantities of water.
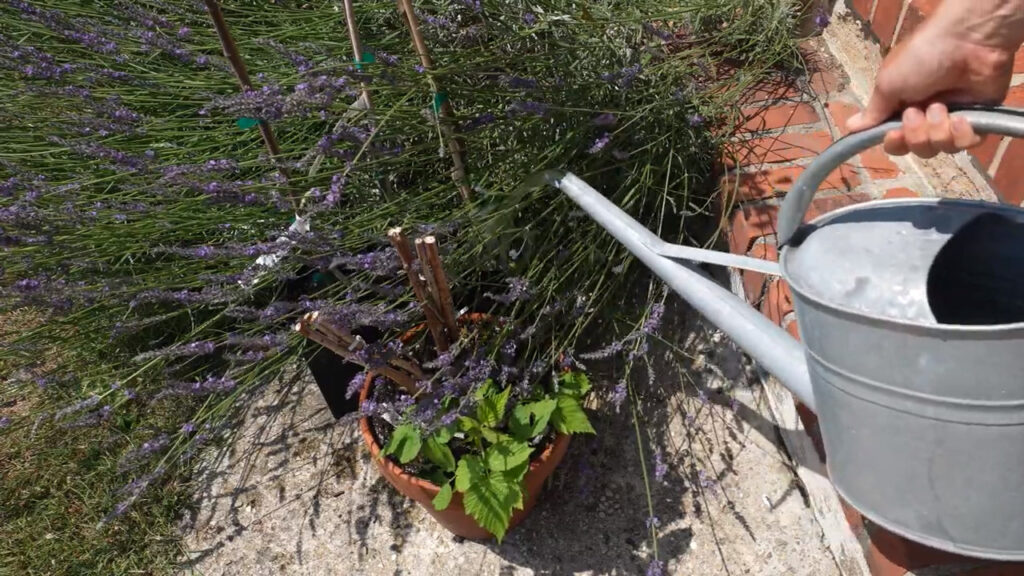
You don’t need a rose on your watering can if you’re bottom watering, but they are nice to have to settle the soil around the seed when you initially plant.
Another tip… bring the water to the trays, not the other way around. You do not want to transport half-full trays of muddy water with fragile plants around your house. That is just a disaster waiting to happen, ON SO MANY LEVELS.
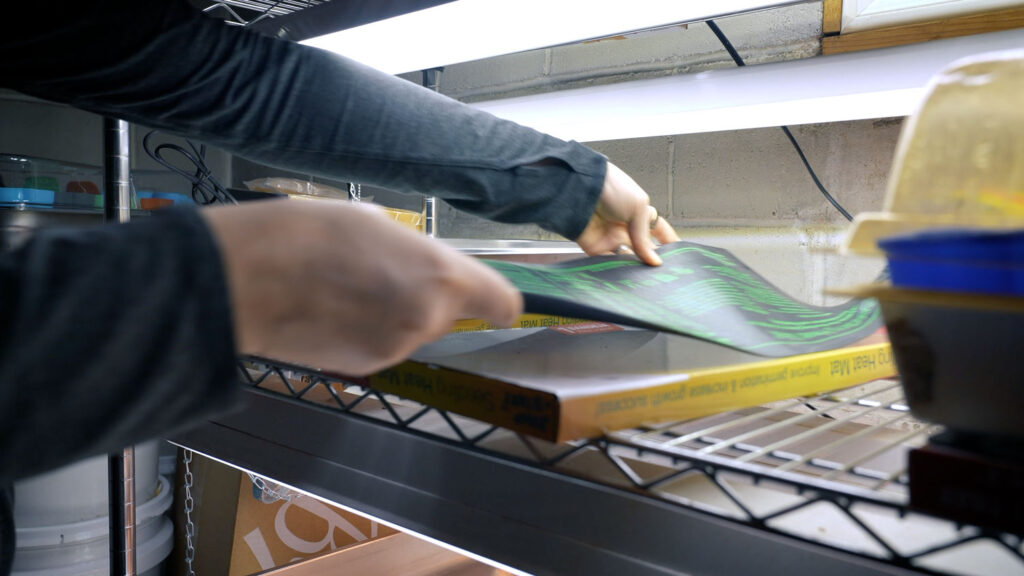
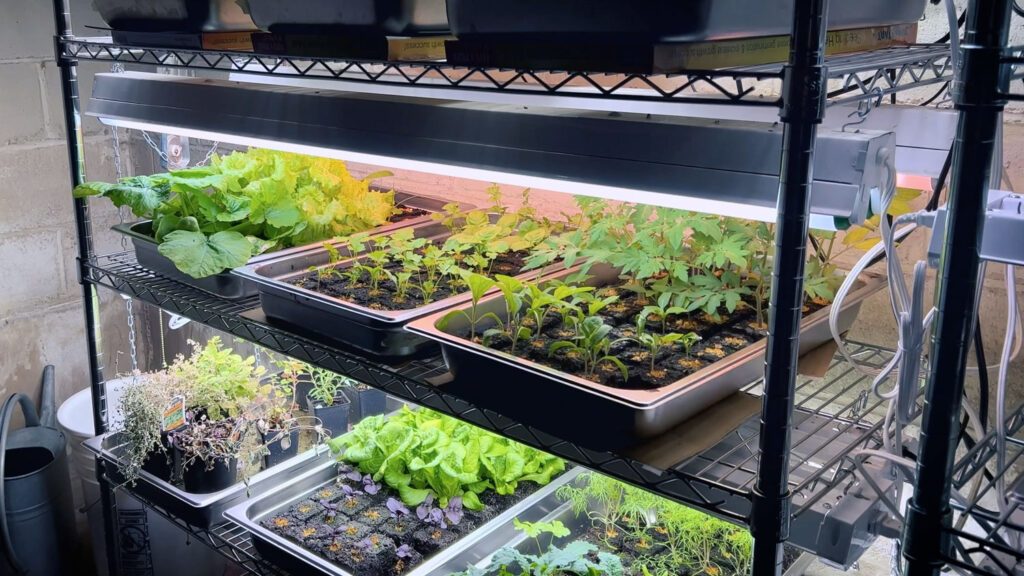
Seed Starting Shelf
Speaking of watering, let’s talk about the place where you’ll be putting the trays. Many people use a seed starting shelf. I do. But you don’t need one. As long as you have a way to position the grow light, you’re fine.
You could buy grow lights with their own stands or do a DIY seedling shelf using the underside of a table or an old bookcase.
It is a nice thing to have, though, especially if you have a lot of trays like me.
If you do want to buy one, I’d recommend getting an inexpensive 48” wide wire utility rack with feet that can level. The wires make it super easy to hang the lights on, and adjustable feet will help keep the water in the trays evenly dispersed.
If you’d like a more in-depth post on how I set up my seed starting shelf and all its components, let me know in the comments and any questions you have.
Grow Lights For Seedlings
You guys are probably not gonna want to hear this, windowsills are just not enough light. Grow lights are something you absolutely need for starting healthy seedlings. Good news is that you don’t need fancy plant lights here.
On each level of my seed rack, I use two standard 48” wide LED shop lights that I got on Amazon.
If you spend a little more money, you can get the same style and size lights that have broader full spectrum light and are purpose-built as plant lights.
I do have some older fluorescent shop lights that I used as grow lights which didn’t work for me and I would not recommend them. They used more energy, the bulbs discolored and made the plants leggy, and I had to replace the bulbs more often. I plan on upgrading those to full-spectrum LED grow lights soon.
Timer
You can have too much light on your seed starts, so don’t be tempted to leave the grow light on permanently. Seedlings that get no sunlight need 16-18 hours of artificial light per day. BUT, that’s exactly why I classify a timer for your grow lights as something nice to have, not a must-have like everyone else.
If, like most people, you get between 6 and 8 hours of sleep a night, you can simply incorporate turning on and off the plant lights into your morning and evening routines. If you’re like me, you might already have habits like opening the blinds or adjusting a thermostat or brushing your teeth that you could habit stack the lights with.
That being said, I do use a timer.
My first timer I stole from my Christmas tree box. The second timer needs a rocket science degree to program. I am about to upgrade to a smart plug I’ve used in other places in my house, with the intention of integrating into a smart home system.
Humidity Dome For Seedlings
Ok, I’m gonna break the internet and say something outrageous—you do not need humidity domes! I rarely rarely use them.
Supposedly they increase seed germination rates, but my seeds germinate fine without them. My seeds are fresh and usually double-seed. For me, propagation domes seem to cause more problems than they’re worth. They leak condensation all over my lights. They’re not durable and break and discolor. They take up space. They’re plastic (you know I love plastic!). If you’re not careful they can cause mold growth and damping off.
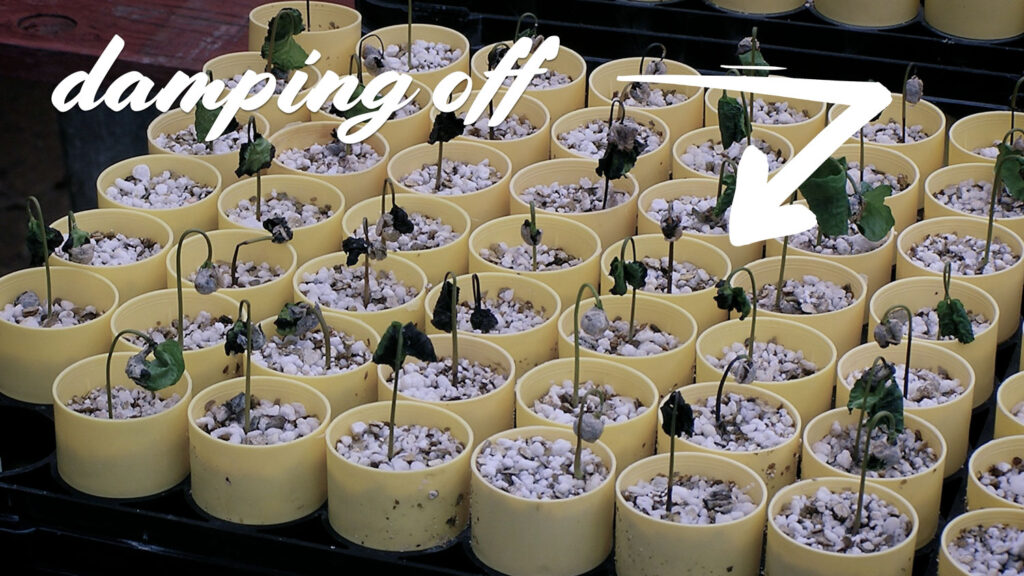
They do do a good job of preserving heat, so I will use them sometimes for faster germination on my heat-loving seeds, but even then you have to be careful because you can quickly steam seedlings to death when domes are combined with a heat mat.
If I haven’t convinced you, don’t worry! Many gardeners use them and there’s a lot of options out there. A lot of seed starting kits already come with seedling domes. Plastic wrap is a good DIY humidity dome option. Just remove it when the sprouts get near the wrap. You can buy domes that fit standard 1020 trays.
Or, if you want to stick around to my next post, I’ll go over a more durable dome that fits my stainless steel seed starting trays.
Fan For Seedlings
Because seedlings live a fairly pampered life indoors, with no wind or rain, they can suffer shock when transplanted outside. (You can even kill your plants like this, so this is no joke. Been there!) Preparing plants for this transplant is called hardening off, basically making them ready for the cruel hard world.
There are other ways to get your plants ready, but blowing a fan on them ahead of time is an easy shortcut.
Is this necessary? No.
Will your family think you’re a nut? Yes.
Is it nice? Yes.
I would say, if you’re a beginning gardener, don’t add this extra step and supply to the mix to stress yourself out. If you’re an intermediate gardener and you have a fan laying around your house, go for it. If you’re advanced, your family already knows you’re crazy.
Fertilizer For Seedlings
Seeds are amazing little packages. Inside them, they have all the nutrients they need to create new life.
Experts do agree that after germination though, they could use some additional help from us in the form of fertilizer, preferably with an NPK value of 10-10-10 for synthetic or 4-3-3 for organic fertilizer. I’m a big fan of Down to Earth fertilizers, which are organic and OMRI-listed.
You can use a liquid fertilizer and mix it directly into your watering can for bottom watering. Or, you can also mix granular fertilizer into your soil mix before your make soil blocks or seed. My only recommendation is, if you’re shopping for fertilizer, just to make sure to get one that doesn’t smell too much since it will be indoors.
I’ll be real, I usually forget to fertilize and my plants are fine. Maybe a little yellow, as you’d expect. So you don’t NEED to do this. But, when I do remember to fertilize, the results are really great, so I’m really making an effort to remember this.
In Summary
So that’s it! To summarize, I’d say you absolutely need only 7 things: seeds, a plan, trays, soil mix, labels, a strong seeding light, and grow lights.
Things that are nice to have are: seed starting kits, seed packet organizer, pots, heat mats, a watering can, a shelf, a timer, humidity domes, a fan, and fertilizer.
Did I miss anything? Let us know your favorite seed starting supplies and tips down in the comments.
I hope this post helped you out! Remember to sign up for my email newsletter for more gardening resources. Keep gardening like a boss and I’ll see you guys soon.
Sources
- https://extension.missouri.edu/publications/g6515
- https://www.extension.iastate.edu/news/gardening-while-isolated-fertilizing-your-seedlings
- https://ag.umass.edu/greenhouse-floriculture/fact-sheets/fertilizing-bedding-plant-seedlings
- https://extension.colostate.edu/topic-areas/yard-garden/fertilizing-the-vegetable-garden-7-611/
- https://extension.unh.edu/resource/fertilizing-vegetable-gardens-fact-sheet
Leave a Reply